


Happy Monday! ^^
Is been a long time since i written a tutorial.
Hopefully i'm not rusty and what i wrote make sense.. haha.
If they don't, you can always drop me an email and i will be happy to reply all your queries. :)
In case you are curious why i named it Gyoza Pouch. :)
Gyoza means dumpling in Japanese, and the pouch do look like a little cute dumpling and it happens to be one of my favorite food, so i named it Gyoza Pouch. LOL
The completed Gyoza Pouch will measure at 4"(L) x 2"(W) x 3"(H)
This tutorial will consist of both machine and handsewing.
I know right, best of both world!
Let's start!

To create a template for the Gyoza Pouch, using a compass, draw 1 circle with diameter 6 inch. At the bottom center of the circle (marked X as shown in the above picture) draw another diameter 6 inch circle. Draw 2 straight lines at the side to connect both circles together as shown in the above picture.
(This template can be re-use many many times to sew the gyoza pouch in other styles, so if possible draw them on a thicker sheet of paper or recycled cardboard)
Beside using a compass, alternatively you can use any circular shape containers.
The size of this Gyoza Pouch can be change by changing the diameter of the circle.
So if you want to make a makeup pouch, you just have to increase the diameter of the circle. :)
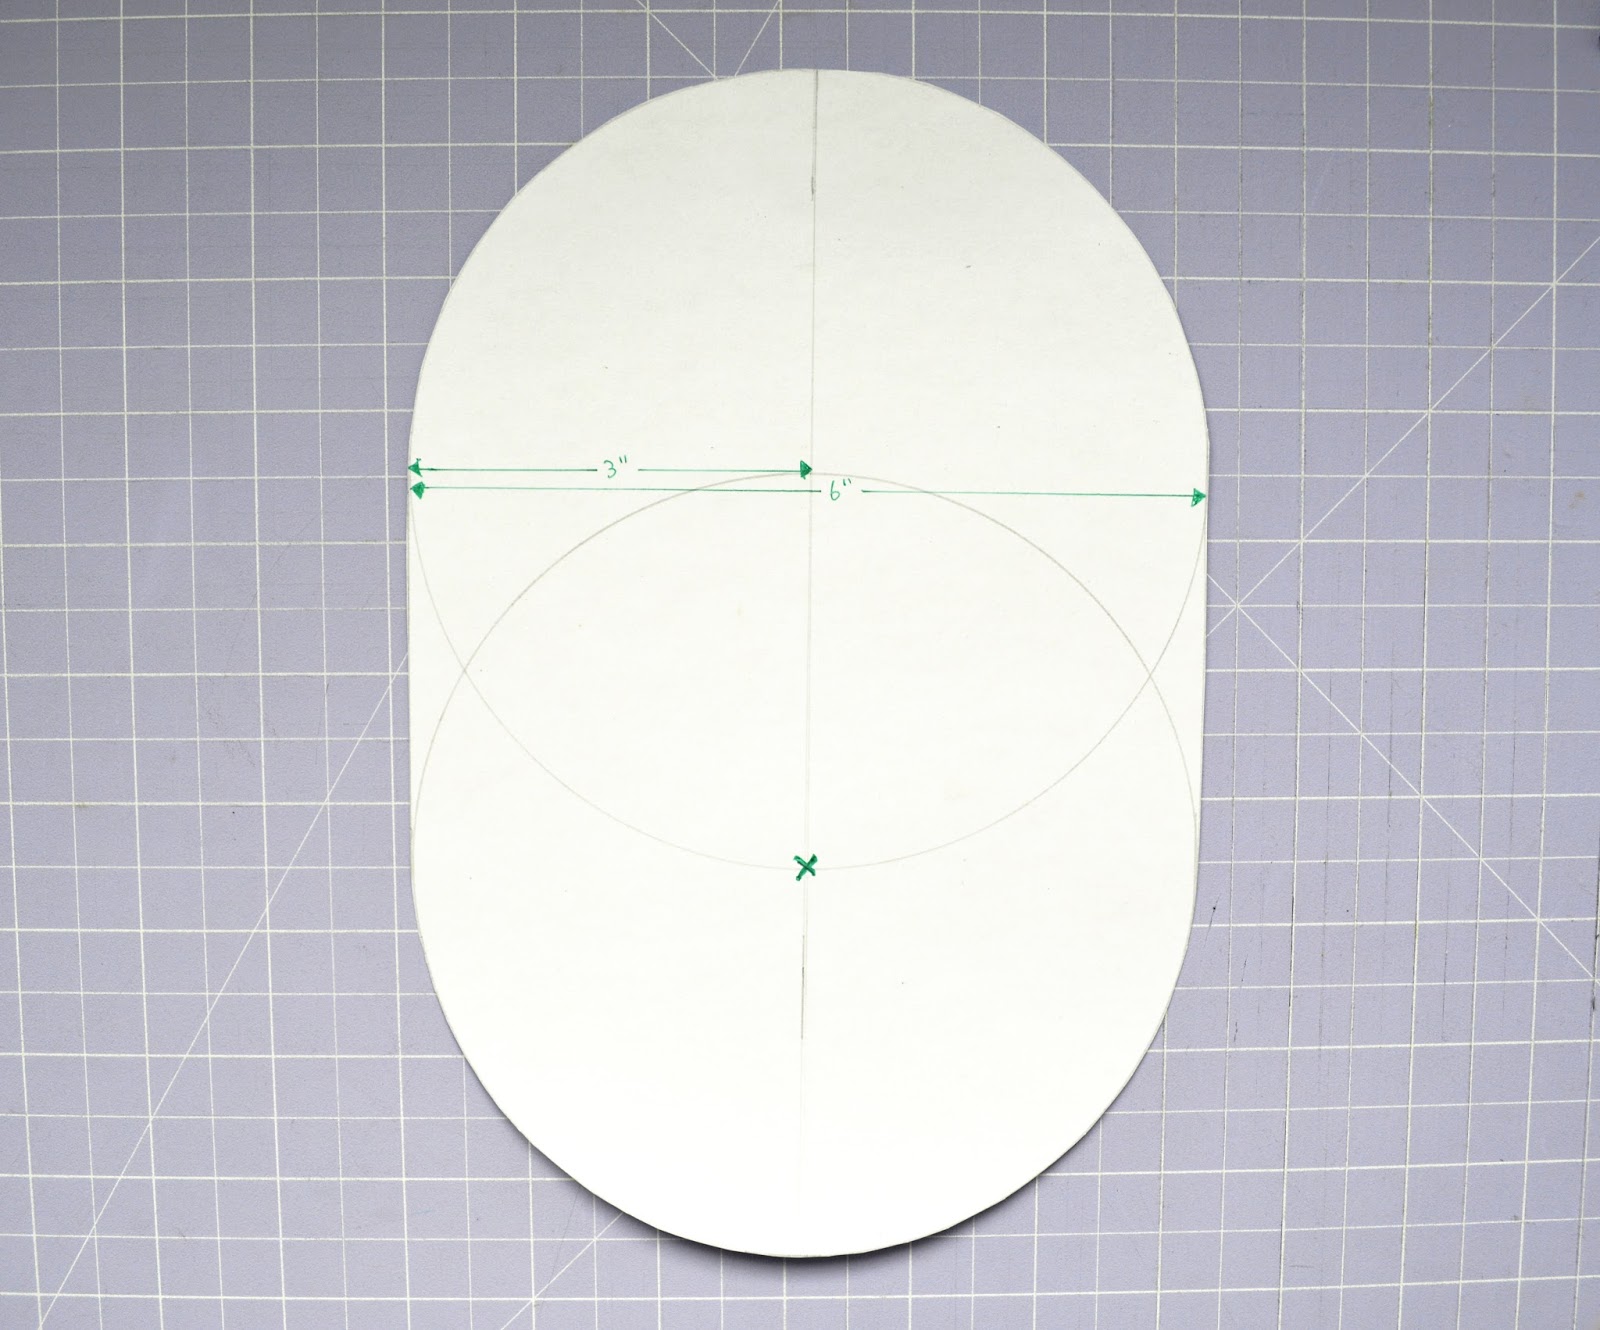
Cut out your template as shown in the above picture.

Materials Required :
★★ Exterior Fabric --> scraps of fabric (for patchwork version like mine) or one fat eighth (for non patchwork version)
★★ Interior Fabric --> one fat eighth
★★ Interfacing --> one fat eighth
(choose your interfacing based on the result that you are after, i use cotton batting for mine.)
★★ Binding --> half a yard
★★ Zipper --> 6"
Cutting Instructions :
Exterior fabric :
For Patchwork version --> cut 2pcs of 1.5" x 5"
cut 2pcs of 1.5" x 7"
cut 3pcs of 1.5" x 9"
cut 1pc of 1.5" x 10"
For non Patchwork version --> you can skip step 1 to 11 and go straight to step 12 and 13.
Cut out your fabric according to the template
Interior fabric --> Cut out your fabric according to the template
Interfacing --> Cut out your Interfacing according to the template
Binding --> cut 2pcs of 3" x 2"
cut 1.25" x 28" Bias Binding.
Bias Binding works better for curves.
The very talented Julie from JayBirdQuilts has written a very detailed explanation on Bias Binding vs Straight of Grain Binding and how to cut Bias Binding.
you can find the link here.
note : out of curiosity, i had tried using straight grain binding for this pouch. Now i can tell you.. 100% sure, please use bias binding. haha. It was a struggle to use straight grain binding on curves! :)
♥ Using 1/4 inch seam allowance throughout ♥

1) fold one piece of 1.5" x 5" scrap fabric in half, so it will create a crease. Repeat same for one piece of 1.5" x 7" scrap fabric.
Align the crease with right side of fabric facing each other. this is an easy way to ensure that both fabric are centered without using your ruler to measure. :)

2) sew the 2 fabric with right side together as shown. Press Seam.

3) With a 1.5" x 9" scrap fabric, repeat step 1 & 2.

4) With a 1.5" x 10" scrap fabric, repeat step 1 & 2.
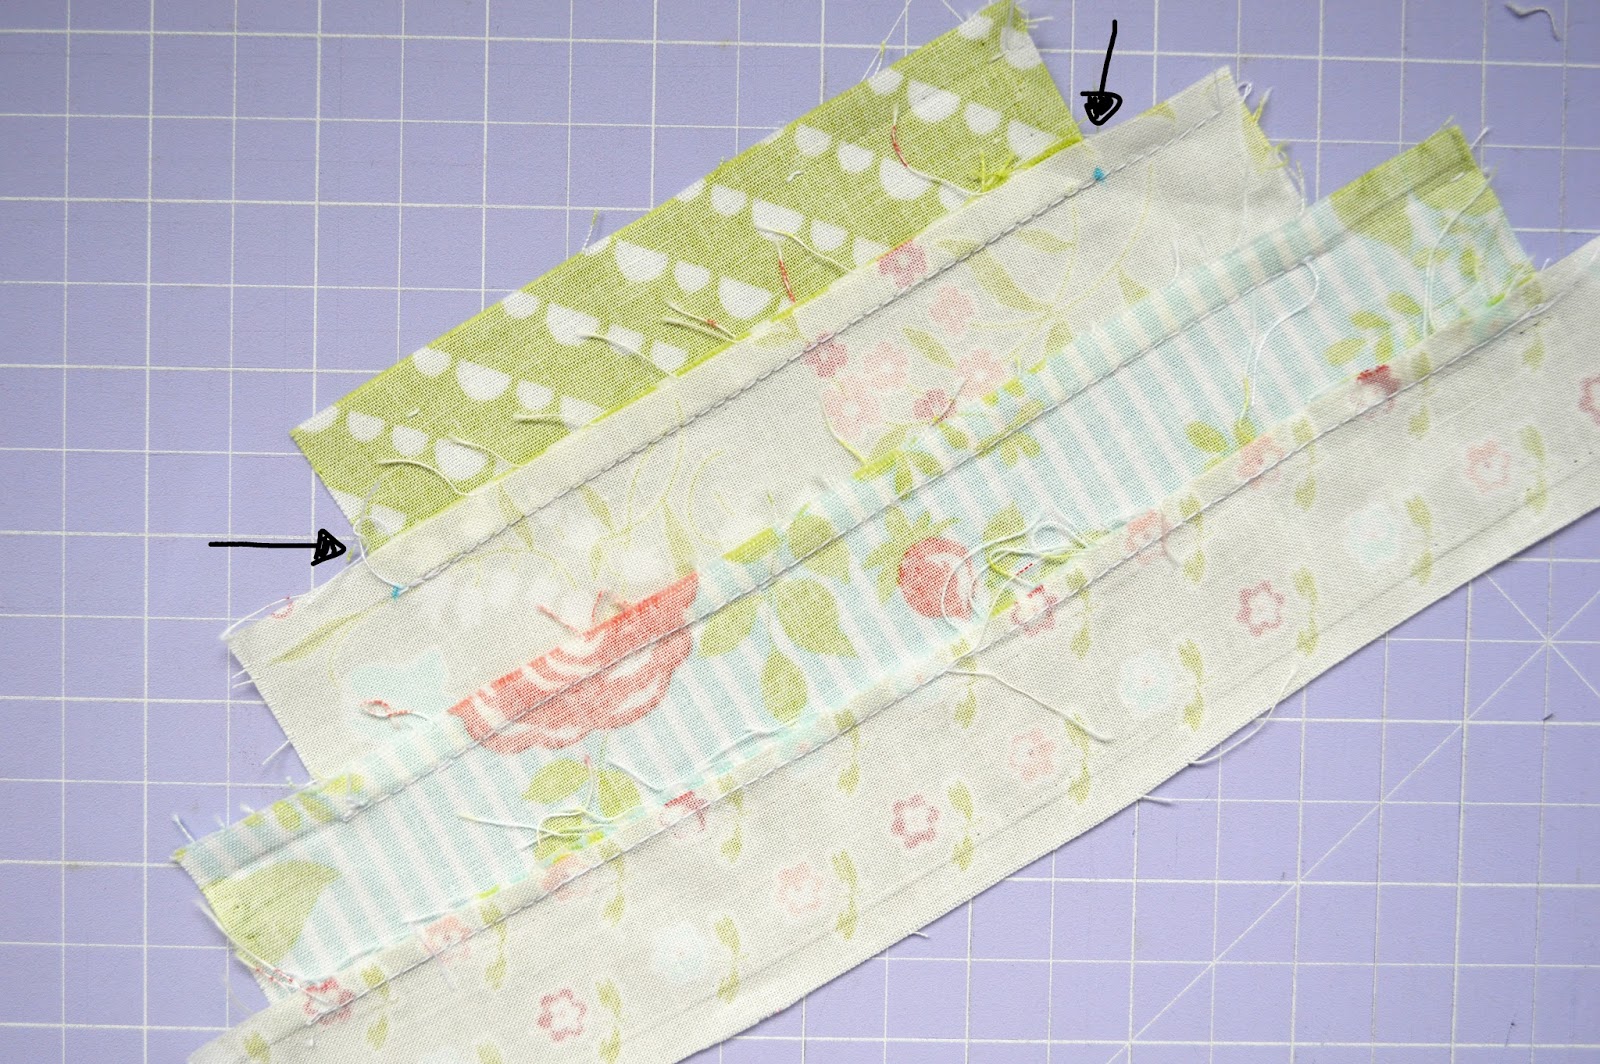
5) Now you will have four rows.
Using a water soluble marker, mark 2 dots as per pointed by the arrows on the wrong side of the fabric.

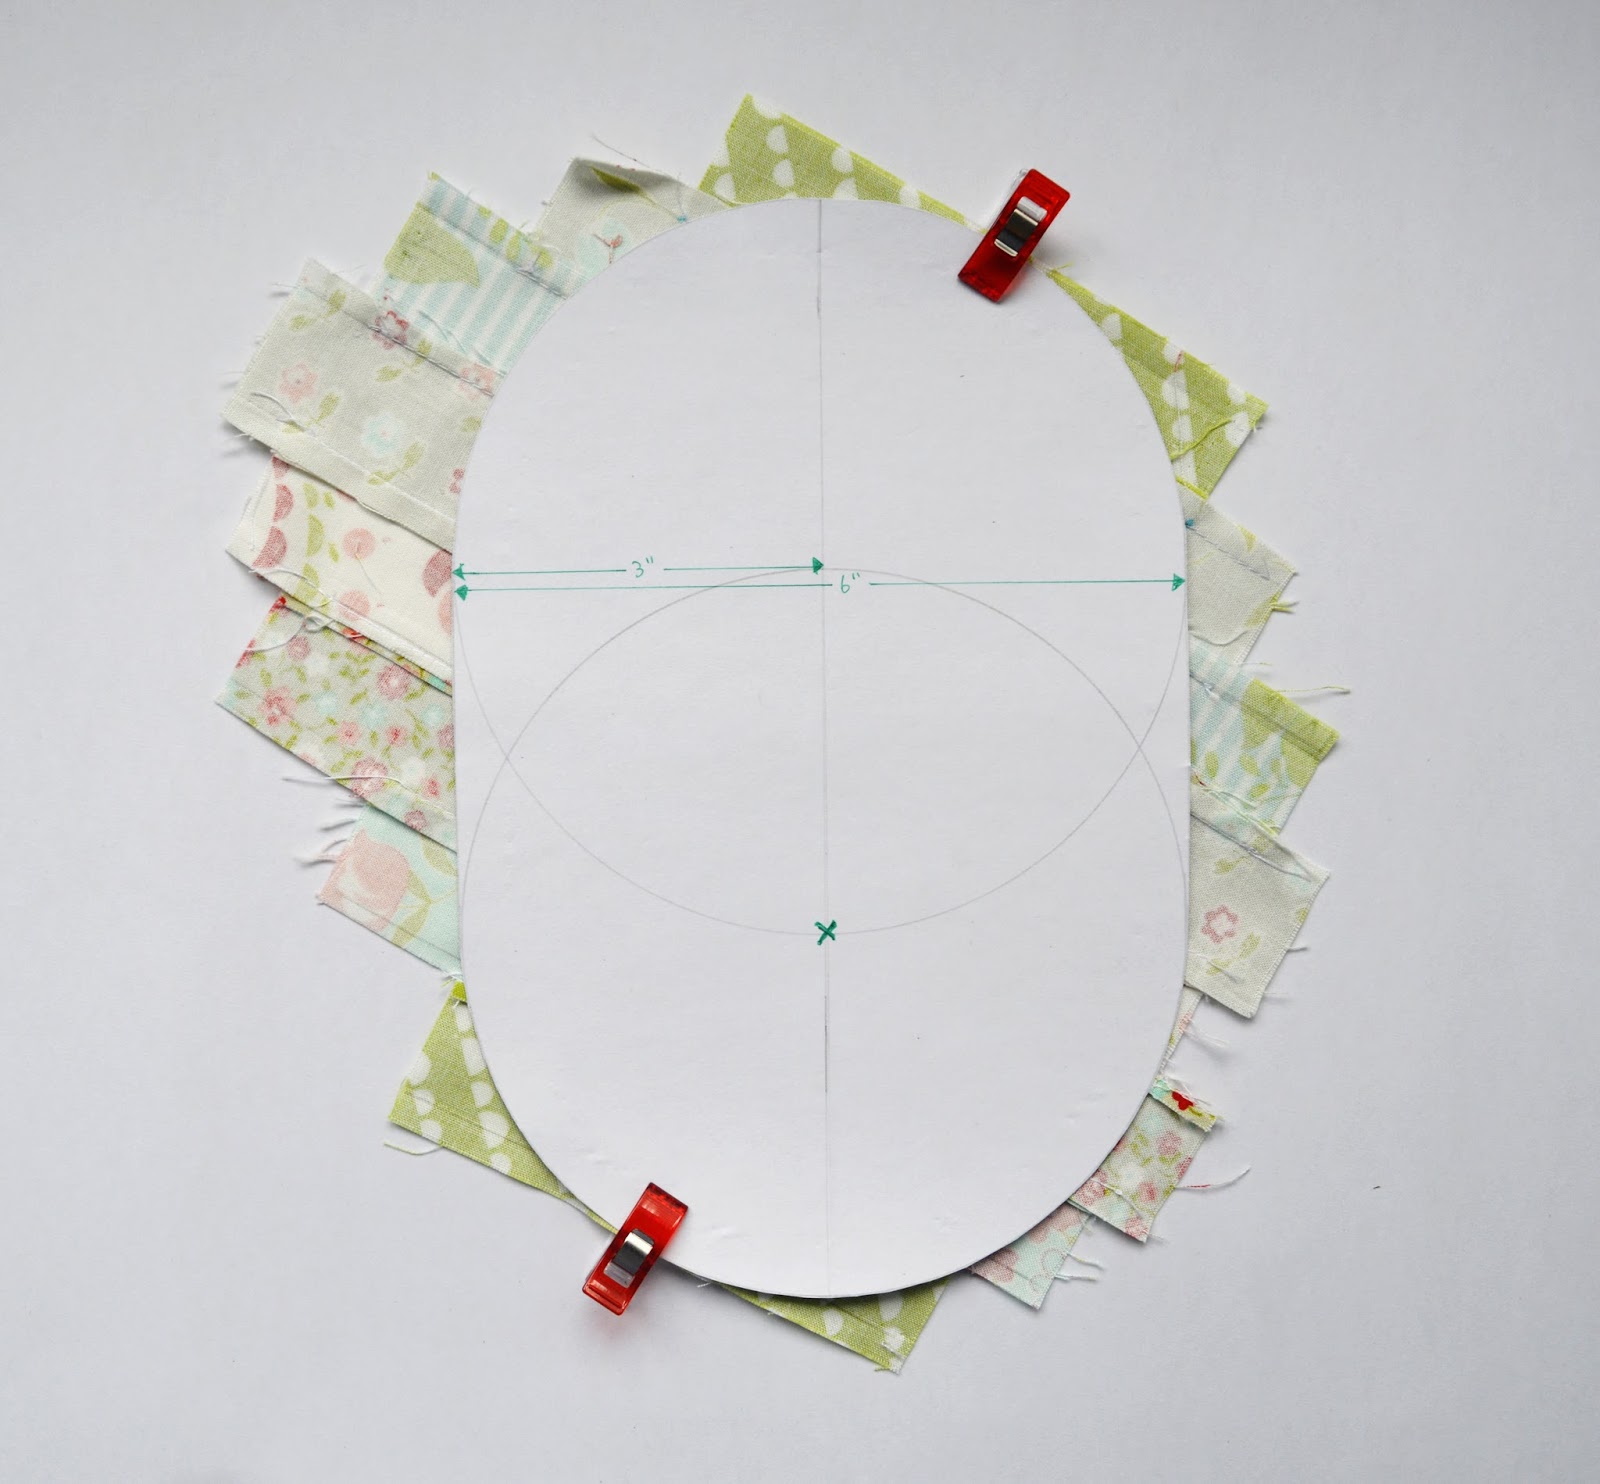
6) Align your template as shown. you can adjust per your liking.
Note that your fabric should be slanted as shown.

7) Once you have adjusted to your liking, Clip it in place. Flip over so the right sides of the fabrics are facing you.

8) With a 1.5" x 9" scrap fabric, adjust it so that it covers your template as shown.

9) Pin them in place with right side facing each other, unclip them from the template and sew them together. Press Seam.

10) Repeat step 6 to 9 with the remaining scraps in this order.
1.5" x 9", 1.5" x 7" and 1.5" x 5"

Here's how the back looks like, my pressing direction. You can press them to your own preference. :)
11) Clip your template in place per your previous alignment in step 6 and cut according to the template.

12) Cut your interfacing and interior fabric according to the template, and placed them together as shown above.

13) Pin them in placed and quilt as desired.

14) We are going to do a single fold binding method for our Gyoza Pouch.
Trim off the top corner of your 1.25" x 28" binding as shown above

15) Pin them in placed as shown above.
Take note that the starting point to pin have to be at the side as shown, as later on the sides will be trim off, so the "joining" of start and end of the binding will not be visible at all. It will be a nice smooth binding :)

16) Pin the binding as shown above along the edges

17) Trim off the excess binding and pin them in place as shown.
There are many ways to join the binding ends, You can check out the many great tutorials and youtube videos online and pick a style that you like. :)
For this tutorial, you do not have to worry too much about the joining part.
It does not have to be perfect as they will be trim off later.

18) With 1/4" seam allowance, sew along the edges as shown

Your "soon to be" Gyoza Pouch should look like this. :)

19) Clip around the edges of the seam allowance.
Be careful not to cut through your sewn line.

20) Flip your pouch over, so the interior fabric is facing up.
Carefully turn the binding over and turn the raw edge of the binding under and pin or clip in placed.

21) With a needle and thread, start the first stitch underneath the binding to hide the knot.

22) Ensure that your folded binding covers the stitched area on the interior fabric.
Blind stitch all the way as shown.

23) To end the stitch, i turn the thread 3 times around my needle and pull through as shown.

24) To hide the knot, put your needle very near the knot and pull through as shown

Ta - daaa... can hardly be seen :)

Your "soon to be" Gyoza Pouch should look like this. All nicely bind.
It will make a great coaster too right?! haha!

25) Now, we are going to start hand sewing the zipper.
you will be surprise how easy it is to hand sew them.
Be careful, you might even be addicted (like me). :)
First fold your pouch in half with right side together.

26) Measure and align the zipper evenly on the center of the pouch.
With the zipper pull on the right side facing downwards, align the zipper teeth along the edge of the binding. Pin them in place.
Note : the zipper teeth has to be along the edge of the binding, not higher or lower.
To ensure the zipper is evenly centered on the pouch. you can use a ruler to do all the measurements. For me, it was a lazy quick method (sorry, i did not take any photos, i will try to explain the best i can). I fold the "half pouch" in half again so it looks like its in one quarter. Using a water erasable fabric pen i make a small dot on the binding where the "fold" is. This will be the center of the pouch. For the zipper, i did the same, fold it in half, make a small dot where the "fold" is. When i pin the zipper to the pouch, i make sure the 2 dots are in line with each other. :)

27) To sew the zipper to the pouch, i start my first stitch under the zipper, so the knot is hidden. Next back stitch throughout the length of the zipper.
Be careful not to sew through all layers of the binding. The needle should only pick up the first layer of the binding fabric next to the zipper
I just found a nice back stitch tutorial over here by Red Brolly .
Her website is awesome. i will have to spend some time browsing through them once i finish this tutorial. :)

28) End the stitch underneath the zipper as shown. The knot will be hidden.

29) Sew another row of back stitch as shown using the same method.
Repeat step 26 to 29 to the other side of the zipper.

30) Do not turn over the pouch.
i have turn them over, but i realise it will work better with the right side still facing each other.
Sew the sides (corner of the Gyoza Pouch to the zipper end) together using Ladder stitch as shown.
I have found another great tutorial on ladder stitch over here
There are so many wonderful and talented people every where. :)

31) one minute quick check.
Flip your pouch over.
Check to make sure that your sides are nicely sewn together with no gaps.
If you like, you can stop here too.
Because you will already have a pouch now, but..... it is not cute..
So, we need to continue.. :)

32) Flip your pouch inside out again.
We are going to create the base now.
This part is important to create an even base.
Fold your pouch as shown, the binding and zipper must be aligned as shown.
Clip them in placed.

33) Use a ruler and water soluble marker, mark and draw a line as shown.
The total base width of the pouch will be 2".
Pin them in placed.

34) Sew on the line that you have drawn, backstitch at the beginning and end.
I sew on the line twice so that it will be more secured. :)

35) Using a 1/4" seam allowance, trim the corner away.

36) Repeat step 33 to 35 for the other corner. Now your pouch should look like this.

37) Now, we are going to cover up the cut corner with binding.
Using 1pc of 3" x 2" fabric, fold it (length 2") in half to create a crease, unfold, fold again as shown.

38) With one side still folded, place your cut corner on it and position them in the center.
Fold up the side to cover the side of the cut corner as shown above and sew them in placed using small running stitch. Do not worry about the start and end knots made.
Your 3" x 2" fabric should be position in such a way that it covers the stitches on your cut corner. If unsure, please refer to the photo of step 42 for how the final result will be like.
Position the fabric in a way to achieve this result.

39) Hand sew your 3" x 2" fabric around the cut corner using blind stitch.
Do not worry about the start and end knots made.

40) From the crease that you have made earlier, fold the fabric in as shown

41) Fold the fabric again as shown and clip them in placed.
This will hide all the knots that you have earlier. :)

42) Blind stitch them in placed.
As usual, start your first stitch underneath the binding to hide the knot, to hide the end knot, please refer to the method in step 24.

43) Repeat step 37 to 42 for the other corner.
Your Gyoza Pouch should look like this now.

44) Turn your Gyoza Pouch right side out.
Your corner binding should sit nicely in the pouch.

45) Ta-daaaa!!
Completed!

Even the bottom is pretty. :)

Hope you have enjoyed making this Gyoza Pouch as much as i do.
If you have any questions, please feel free to drop me an email. :)
Please also tag me on Instagram, i would love to see all your lovely version.
Have a lovely week.
xoxo Jean
That is a cute pouch Jean! I certainly have plenty of scraps to make one of these (or more). I will give it a try soon. Thank you for the tutorial!
ReplyDeleteIts beautiful, and adorable. You are such a neat sewer!
ReplyDeleteI'm glad I found your blog again, Jean.
good to be here
ReplyDelete